Content
- About AMB82-Mini
- Hardware
- Software
- Application - Multimedia
- Application - Neural Network
- Application - On Screen Display (OSD)
About AMB82-Mini
Where to purchase AMB82-Mini?
A: You can purchase the board at this link.

Where to find the open-source SDK for AMB82-Mini?
A: You can find the open-source SDK for AMB82-Mini development board in the links below.
Where to find the pin diagram for AMB82-Mini?
A: Navigate to the “Getting started” page to see the pin diagram via this link.
What are the features for AMB82-Mini?
A: You may refer to the following link to learn about the features of the AMB82-Mini development board.
AMB82-MiniDoes AMB82-Mini have built-in security feature?
A: Yes. AMB82-Mini development board supports Secure Boot and Trust-Zone.
Which BLE roles are supported?
A: AMB82-Mini can operate as either a BLE Central or BLE Peripheral device.
Which Bluetooth standard are supported in AMB82-Mini?
A: AMB82-Mini supports BLE 5.1. Classic Bluetooth (BR/EDR) is not supported.
Is XIP (execute in place) supported on AMB82 Mini?
A: Yes, it is supported.
Does AMB82-Mini support 5G WiFi?
A: Yes, AMB82-Mini supports dual band 2.4G + 5G WiFi.
Does AMB82-Mini have user-configurable push buttons and LEDs?
A: AMB82 Mini does not have user-configurable push buttons but has 2 user-configurable LEDs.
How to use user-configurable push buttons and LEDs on AMB82-Mini?
A: AMB82 Mini does not have user-configurable push buttons. However, LED options for the onboard LED are “LED_B” (On-board blue LED) and “LED_G” (On-board green LED).
Can I use a different camera module with AMB82-Mini?
A: You may use a different camera module; however, currently, Ameba Pro2 Arduino SDK only supports the JXF37 and GC5035 camera module. Therefore, if a different camera module is used, video-related examples will not work.
Does AMB82-Mini have auto flash mode?
A: No. AMB82-Mini development board does not have auto flash mode.
Who should I contact if I encounter an issue while using HUB 8735?
A: You can proceed to this GitHub repository and raise an issue in the corresponding repository.
Hardware
How to enter download mode with AMB82-Mini?
A: Press and hold the UART DOWNLOAD button. Then Press the RESET button and release both UART DOWNLOAD and RESET buttons.
How do I know if my board successfully enters download mode?
A: Open up your Serial Monitor, and you will see the following if your board successfully enters download mode:
In Serial Monitor:
== Rtl8735b IoT Platform == Chip VID: 0, Ver: 0 ROM Version: v3.0 Test Mode: boot_cfg1=0x0[test mode PG]
test_mode_img_download
Download Image over UART1[tx=4,rx=3] baud=115200
How do I exit download mode?
A: To exit download mode, press the reset button.
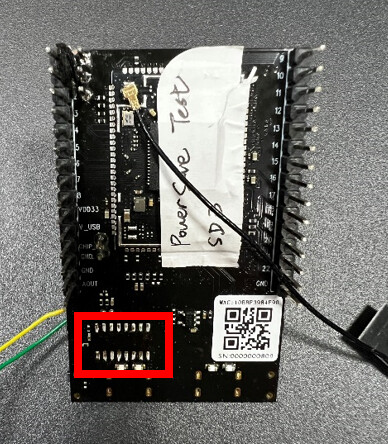
How to measure module's power consumption in Power Save mode?
- Remove the onboard CH340 to disable the onboard log features. For reading logs, you might need to use an external USB-to-UART module.
- Remove the D3 LED (power indicator) to reduce unnecessary power consumption.
- Remove R62 from the AMB82-MINI. Connect DMM6500 positive port (+) to the R62 pad closer to inductor L1, and connect the negative port (-) to the other side of the R62 pad. Therefore, the whole IC power consumption on 3.3V will be measured.
- Set up according to the connection below, connecting the DMM6500 DIGIT MULTIMETER in series to the additional USB-TTL converter and V_USB to measure the current flow on 3V3 while supplying power to the AMB82-MINI board.
- To read the log from USB UART, connect the external USB-TTL converter to J6 (PF3 & PF4). Remove the connection to LOG_TX & LOG_RX before starting the current measurement to reduce the current consumption.


Why is my board unable to connect to WiFi?
A: Please ensure that you have attached the Dualband Wi-Fi (2.4GHz/5GHz) ipex antenna to the board.
Software
How to add AMB82-Mini on Arduino IDE?
A: Open Arduino IDE. To set it up correctly in Arduino IDE, go to “File” -> “Preferences” and paste the following URL into the “Additional Boards Manager URLs” field:
https://github.com/ambiot/ambpro2_arduino/raw/main/Arduino_package/package_realtek.com_amebapro2_index.jsonNext, go to “Tools” -> “Board” -> “Boards Manager” and install the AMB82-Mini board.
You may follow the guide on this page.
Why am I getting "ping retry failed", "Uart boot fail" error?

A: If you are getting this error, it means that your board did not enter download mode. To enter download mode, press and hold the “UART DOWNLOAD” button. Then press the RESET button and release both the UART DOWNLOAD and RESET buttons.
How to erase firmware from flash on AMB82-Mini on Arduino IDE?
A: Go to “Tools” -> “Erase All Flash Memory (16MB)” -> “Erase only”. If "Erase then Upload" is selected, code will be uploaded immediately once flash memory has been erased.

What if Arduino IDE on Ubuntu is unable to locate or detect the com port?
A: To check if the port is detected, plug in your board and key in ls /dev/tty*.
You may refer to this link.
OR
- Run
sudo lsusbin the terminal. - Look for the ID in the log. Take the ID for Linux Foundation 2.0 root hub.
- Edit file
/etc/brltty.conf. To open thebrltty.conffile, you may use this command:open /etc/brltty.conf. - Look for "braille-device usb:0000:0000 #Specific USB device by serial number."
- Replace "usb:0000:0000" with the ID shown on your Terminal. For example:
braille-device usb:1d6b:0002 #Specific USB device by serial number.and save the file. - To check if the port is detected, plug in your board and key in
ls /dev/tty*.
I am unable to compile on Ubuntu, what should I do?
A: For AmebaPro2, you need to have Ubuntu version 22 and above (Linux). For Ubuntu versions below 22, Arduino is unable to support some libraries used for AmebaPro2.
What if I encounter this error, “AmebaPro2 directory only allow 1 SDK! Please check again. exit status 1”?
A: Ensure that you have only one SDK in the C:\Users\{username}\AppData\Local\Arduino15\packages\realtek\hardware\AmebaPro2 folder.
Application – Multimedia
How many ISP channels are supported on AMB82-Mini?
A: There are a total of 4 usable ISP channels.
What is the difference between selecting “VIDEO_H264”, “VIDEO_JPEG” and “VIDEO_H264_JPEG” video encoder type?
A: “VIDEO_H264_JPEG” is a double encoder whereby live streaming can take place and at the same time taking snapshots. "VIDEO_JPEG" and "VIDEO_H264" are single encoders that can either take snapshots only or live stream through RTSP on media players like VLC only, respectively.
How to achieve a better video quality on AMB82?
A: There are some recommended settings to achieve better video quality. By default, the bitrate is set to 4 Mbps; however, depending on the quality of your WiFi network, you may consider the following settings:
- Recommended setting for applications that involve transmitting data over WLANs: 1080p or 720p @ 2Mbps
- Recommended setting for recording MP4 files to external storage such as an SD card or transmitting data over LANs: 1080p @ 4Mbps
Application – Neural Network
Does AMB82-Mini support TensorFlow Lite?
A: No. However, AMB82-Mini has a built-in NN engine that can be used with pre-trained models.
What are the available Neural Network models that can be used?
A:
- Object detection (Yolov3-tiny, Yolov4-tiny, Yolov7-tiny) https://github.com/AlexeyAB/darknet
- Face detection (SCRFD, CenterFace, RetinaFace) SCRFD, CenterFace, RetinaFace
- Face recognition (MobileFaceNet) https://github.com/deepinsight/insightface/tree/master/recognition
- Sound classification (YAMNet) https://github.com/tensorf
Can I build my own Neural Network model and use on AMB82-Mini?
A: Yes, you can. Please convert your AI model here: https://www.amebaiot.com/en/amebapro2-ai-convert-model/. Currently the online tool only supports yolov3-tiny, yolov4-tiny, yolov7-tiny, mobilefacenet, and scrfd models. You will need to sign up for an AmebaIoT account to be able to use the online tool.
Refer to https://www.amebaiot.com/en/amebapro2-apply-ai-model-docs/ to learn how to install the AI-converted model.
What is “Quantize Type” in AMB82-Mini AI Model Conversion?
A: “Quantize Type” indicates to what degree the model will be compressed. INT16 provides less model compression than UINT8. On the other hand, INT16 will allow for higher model accuracy.
What kind of image should I upload for “Upload one jpg file” and “Upload jpg files” in AMB82-Mini AI Model Conversion?
A: “Upload one jpg file” refers to the image in the dataset that you have to upload to be used to train the model. This is a mandatory step. The other “Upload jpg files” is optional. You may wish to upload an additional image, which may improve model training.
After uploading my .cfg and .weights files in AMB82-Mini AI Model Conversion, I received the following error message via email. What should I do?
A:

First ensure that you’ve uploaded files that are in .cfg, .weights and/or .onnx format. The online conversion tool does not currently support any other format. If you’ve generated files in other formats, use tools available online to convert them to the supported formats before using our tool.
Next, check if the .cfg and .weights (or .onnx) files are placed in the same directory of your zip file.
Why Neural Network failed to execute after the code is uploaded?
A: For all Neural Network example, it is mandatory to call modelSelect(nntask, objdetmodel, facedetmodel, facerecogmodel) method before calling begin() method. Indicate which NN task you would want to perform and select the models accordingly. Do refer to the example guide under Neural Network category for more information. https://www.amebaiot.com/en/amebapro2-amb82-mini-arduino-peripherals-examples/#ambpro2-arduino-ai
Can I run multiple models in one example?
A: Yes, however, you need to load models using SD card.
How do I load NN models using SD Card instead of Flash?
A: Please refer to https://www.amebaiot.com/en/amebapro2-apply-ai-model-docs/.
How can I run my customised model on AMB82 Mini using Flash?
A: Please refer to https://www.amebaiot.com/en/amebapro2-apply-ai-model-docs/.
If you are loading NN model using flash, kindly place your customised model in the following directory: Arduino15/packages/realtek/hardware/AmebaPro2/{SDK version}/libraries/NeuralNetwork/{example}

Next, in the code, do remember to choose the customized option (e.g., CUSTOMIZED_YOLOV4TINY, CUSTOMIZED_SCRFD, CUSTOMIZED_MOBILEFACENET) in the ModelSelect function.
Please refer to example guide at https://www.amebaiot.com/amebapro2-amb82-mini-arduino-peripherals-examples/#ambpro2-arduino-ai.
Application – On Screen Display (OSD)
How to create objects in different colors on each video channel?
A: To create objects in different colors, you can choose to create 1 layer for 1 color.
Is OSD supported on all video channels?
A: No. OSD are only supported on channel 0,1 and 2.
Can I display more than 30 objects on 1 channel?
A: Yes, there are a total of 6 layers that can be used. Each layer can support up to 30 OSD objects. To use the layers, always create a bitmap and update the layer after drawing. For example:
OSD.createBitmap(CHANNEL, OSDLAYER1);
// drawing task
OSD.update(CHANNEL, OSDLAYER1);